Shopify Plus Checkout Extension: Set up Collection-Based Product Recommendations from Scratch
Shopify Plus Checkout Extension: Set up Collection-Based Product Recommendations from Scratch
Suggesting products from a specific collection under the order summary in Shopify Plus checkout is called Checkout UI Extension. The installation document exceeds 80 pages, but those documents don't reveal where the real challenge lies. This article presents 6 pitfalls learned over 18 deployments during a real implementation, complete with full code examples.
A Checkout UI Extension is how a Shopify app adds its own interface components to checkout. Extensions on the information, shipping and payment steps only run on Shopify Plus and Partner development stores, while Thank you and Order status page extensions run on every plan except Starter. This guide builds one that recommends collection products below the order summary with Preact and the Storefront API.
In Shopify Plus checkout, the way to recommend products from a specific collection below the order summary is a Checkout UI Extension. The setup documentation runs to more than 80 pages, but it doesn't tell you where the real difficulty lies. This article shares 6 pitfalls we learned over 18 deploys during a real implementation, with full code examples.
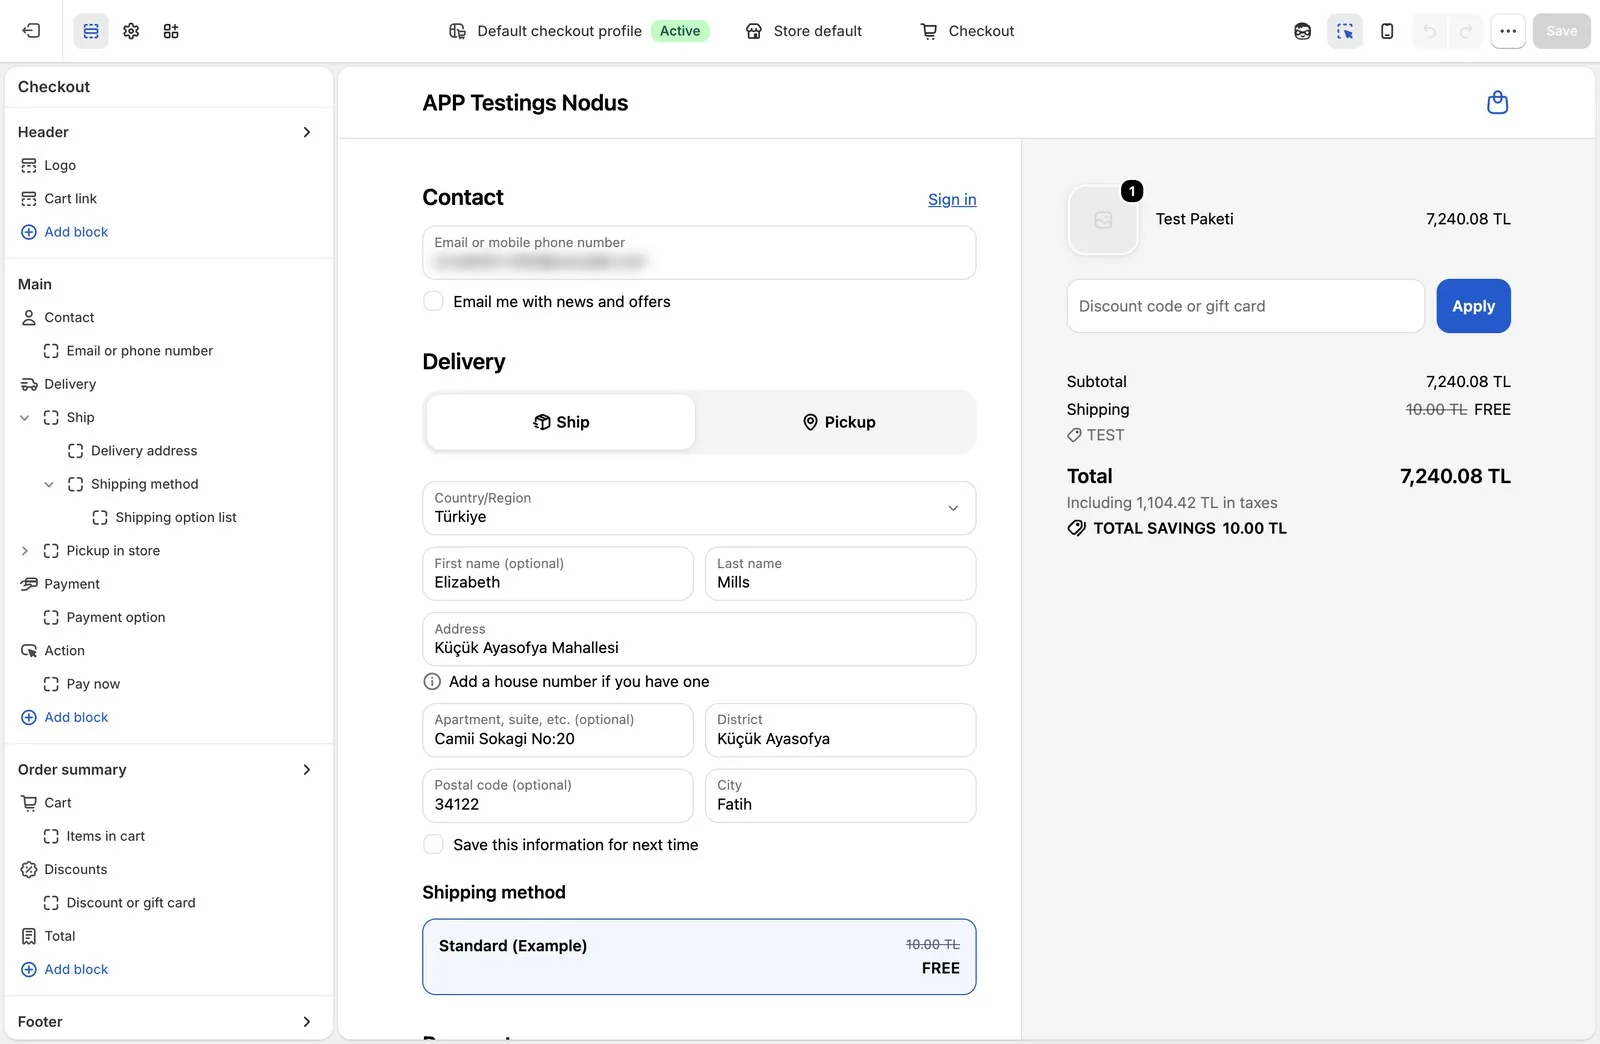
Ultimately, you'll have this working: an extension that pulls dynamic products from a Storefront collection, switches between an "Add" button and a quantity stepper, and is protected against double-click race conditions, all appearing directly below the order summary's total line. The merchant can configure which collection to use from the Shopify checkout editor without changing any code.
What We'll Build
The checkout upsell extension uses an API surface exclusive to Shopify Plus: Checkout UI Extensions. It's not possible to inject code into the checkout on standard Shopify plans. Therefore, extension development is limited to Shopify Plus or Shopify Developers Preview.
The component we'll build will look like this:
+------------------------------------------------------------+
| You may also like                                          |
|                                                            |
| [ 64px ]  Product title                            [ Add ] |
| [ img  ]  $24.90                                           |
|                                                            |
| [ 64px ]  Product title                    [ - ]  2  [ + ] |
| [ img  ]  $18.90                                           |
+------------------------------------------------------------+
Three columns: a 64-pixel thumbnail, a flexible title + price block, and an "Add" button for products not in the cart, or a quantity stepper if it's already in the cart. Stack: Preact + JSX, Shopify checkout web components (<s-grid>, <s-stack>, <s-button>), Storefront API via shopify.query. No external CSS, no external state library. ~330 lines, single file.
# Required for Storefront API calls (shopify.query) [extensions.capabilities] api_access = true
Critical: Without the api_access = true line, every call to the Storefront API silently fails. This is the easiest step to miss and the most confusing part of the setup.
Pitfall 1: api_access Capability - Mentioned Twice in the Docs
When you make your first call to the Storefront API with shopify.query(...), you'll see this error in the browser console:
Uncaught (in promise) TypeError: shopify.query is not a function
In the Shopify Partners dashboard, there's a toggle called "Network access." This toggle is for making requests to external URLs; for the Storefront API, a different capability is required. The two are not interchangeable.
What happens without an error message: useEffect silently fails, the extension renders with zero products, and no error appears on screen. The only signal is a console message; nothing appears broken at the UI level.
The solution is to add a single line to shopify.extension.toml:
# Capability required for the Storefront API (shopify.query)
[extensions.capabilities]
api_access = true
# network_access is only for requests to external URLs; the Storefront API doesn't need it
This line enables the shopify.query call and, consequently, all GraphQL Storefront API queries. When creating a new extension, the first thing to do is add this line, then start coding.
Checkout extensions do not take pixel coordinates; they are injected into predefined targets in the DOM. Available targets in the order summary panel include:
Target
Render Location
Suitable for Upsell?
purchase.checkout.cart-line-list.render-after
Below the product list, before the total line
No - Pushes the total line to the bottom of the screen.
purchase.checkout.reductions.render-before
Above the discount code box
No - Wrong context, mixes with the discount area.
purchase.checkout.reductions.render-after
Below the discount code box
Partial - Total amount remains visible, but its position on the page is variable.
purchase.checkout.block.render
Dynamic location determined by the merchant in the checkout editor
Yes - Provides full control, can be placed exactly below the total area.
Most Shopify tutorials use cart-line-list.render-after. In practice, this target creates a problem: the upsell banner pushes the order total out of the visible area. Customers want to see what they're paying before clicking the "Add" button; if the total is off-screen, this connection is broken.
purchase.checkout.block.render presents the extension as an independent App block in the checkout editor. The merchant drags this block from the left panel and places it "below the cost summary." The setup step is a single drag-and-drop; in return, you gain full placement control and flexibility for future changes.
In shopify.extension.toml, targeting is defined as follows:
[[extensions.targeting]]
target = "purchase.checkout.block.render"
module = "./src/Checkout.jsx"
# Suggested initial placement in the editor: below the money lines in the order summary.
# On mobile this placement renders below the Pay button; the merchant can move the block in the editor.
default_placement = "ORDER_SUMMARY4"
Pitfall 3: camelCase Requirement - Silent Failure
Shopify checkout extensions come as custom elements: <s-grid>, <s-stack>, <s-button>, <s-image>. In Preact JSX, the attributes for these elements appear to be writable in both kebab-case and camelCase. Only camelCase works.
The @shopify/ui-extensions/preact register directly binds JSX prop names to component property setters. Setters only respond to camelCase names; kebab-case attributes are not read, and the component falls back to its default.
// Wrong: kebab-case props aren't read, the component falls back to its default


  {/* title + price, button */}


// Right: camelCase props bind directly to the property setter


  {/* title + price, button */}
No error message. Only the incorrect layout appears on screen. Affected props: gridTemplateColumns, alignItems, inlineSize, borderRadius, paddingBlock, paddingInline, labelAccessibilityVisibility, accessibilityLabel. If your checkout component "isn't taking its style," this is the first place to check.
Practical rule: When writing props for any new <s- component, first check that it's camelCase. There's no difference for single-word props (gap, border, background); this rule applies to every two-word prop.
Pitfall 4: s-button Does Not Expose the icon Prop on the Checkout Surface
For compact − / + stepper buttons, it seems logical to write icon="minus" and icon="plus" on an s-button. The result is an empty, bordered square.
On the checkout surface, s-button inherits only specific props from the base type:
// @shopify/ui-extensions, surfaces/checkout/components/Button.d.ts (2026-07)
// icon exists on the base type (ButtonProps$1) but isn't in this list
export interface ButtonElementProps
  extends Pick<
    ButtonProps$1,
    | 'accessibilityLabel'
    | 'command'
    | 'commandFor'
    | 'disabled'
    | 'href'
    | 'id'
    | 'inlineSize'
    | 'interestFor'
    | 'loading'
    | 'target'
    | 'tone'
    | 'type'
    | 'variant'
  > {
  // tone, type, variant and target are redeclared here with narrowed types
}

// onClick is the only exposed event
export interface ButtonEvents extends Pick {}
The icon is not included in this Pick<>. If you write it in JSX, the component won't read it, and nothing will render. This pattern applies to many components on the checkout surface: props that exist in the base type but are not exposed at the element level are silently swallowed.
The solution is to build the stepper button with s-clickable + s-icon:
function StepButton({icon, label, disabled, onClick}) {
  return (
          onClick={onClick}
      disabled={disabled}
      accessibilityLabel={label}
      // border="base base": width + color. "base" alone draws an invisible border
      border="base base"
      borderRadius="base"
      paddingBlock="small-200"
      paddingInline="small-100"
    >


  );
}
Two more details:
border="base base" is the second base color value. If you only write border="base", only the thickness is assigned, a transparent 1px border renders, and nothing is visible. A color value must be added.
paddingBlock and paddingInline control the vertical and horizontal axes independently. This is useful for buttons that look square but have rectangular content.
Pitfall 5: s-number-field Cannot Be Collapsed
Shopify's s-number-field component with the controls="stepper" property truly looks Polaris-quality: − and + controls within a single bordered box, keyboard support, and all accessibility features:
  label="Quantity"
  labelAccessibilityVisibility="exclusive"
  controls="stepper"
  value={String(line.quantity)}
  min={0}
  max={99}
  step={1}
  onChange={(event) => onQuantityChange(Number(event.currentTarget.value))}
/>
{/* inlineSize isn't exposed on this element; the field fills the whole row */}
Problem: this component has a minimum inline width and cannot be collapsed. The inlineSize="fit-content" prop does not work with s-number-field. When used on the same line as a 64px thumbnail and product title, the control expands to fill the entire line, breaking the layout.
Approach
Appearance
Works in Compact Row?
s-number-field controls="stepper"
Native Polaris, connected input + buttons
No - Cannot be collapsed, breaks the layout.
Custom stepper with s-clickable + s-icon
Three separate elements, no connected-input appearance
Yes - Provides full control and fits a compact layout.
For layouts where the thumbnail + title + quantity control are on the same line, use a custom stepper:
s-number-field is useful in wide interfaces where the quantity input takes its own line. In any layout where it needs to share a line, prefer a custom stepper.
Pitfall 6: Async Mutation Race Condition and Global busyId
applyCartLinesChange is an async operation. If a customer quickly clicks the + button twice, two updateCartLine calls will overlap, and the result might be an incorrect quantity. When multiple products are clicked consecutively across the strip, responses can interfere.
The pattern implemented by Nodus Works: a single busyId state at the top of the component. It only holds the variantId to indicate which product is being processed.
// One lock for every row in the strip: the variantId being processed, or null
const [busyId, setBusyId] = useState(null);
// A second click in the same frame hits the ref before the state updates
const busyRef = useRef(null);

async function runCartChange(variantId, change) {
  if (busyRef.current) return;
  busyRef.current = variantId;
  setBusyId(variantId);
  try {
    const result = await shopify.applyCartLinesChange(change);
    // result.message isn't shown to the buyer; it's for debugging only
    if (result.type === 'error') console.warn(result.message);
  } catch (error) {
    console.error(error);
  } finally {
    busyRef.current = null;
    setBusyId(null);
  }
}
Each offer card takes two props:
  key={offer.variantId}
  offer={offer}
  line={lineByVariant.get(offer.variantId)}
  // This row is processing: the CTA shows loading
  isBusy={busyId === offer.variantId}
  // Another row is processing: this row is disabled
  disabledOthers={busyId !== null && busyId !== offer.variantId}
  onAdd={() => addOffer(offer)}
  onQuantityChange={(next) => changeQuantity(offer, next)}
/>
The CTA of the busy row shows loading={true}. All other rows are disabled. The customer sees which row is being processed, and two mutations cannot be fired simultaneously.
This pattern should not be skipped with the assumption, "There's only one button, so it's not needed." A second button for a stock alert, a campaign button, or a bundle suggestion could be added within a week, and at that point, the race condition would return as a hard-to-trace bug.
Writing the Collection Query Correctly
The Storefront API query is made via shopify.query and requires api_access = true. The collection handle and maximum number of products are read from merchant settings:
// The merchant sets these in the checkout editor; fall back to defaults when empty const settings = shopify.settings.value; const collectionHandle = String(settings.collection_handle ?? '').trim(); const maxProducts = clamp( Number(settings.max_products) || DEFAULT_MAX_PRODUCTS, 1, MAX_PRODUCTS_LIMIT, ); // Prices come back in the currency of the buyer's country const country = shopify.localization.country.value?.isoCode ?? null;
async function loadOffers() { setLoading(true); try { const {data, errors} = await shopify.query(COLLECTION_QUERY, { variables: {handle: collectionHandle, first: maxProducts, country}, }); if (errors?.length) console.warn('Storefront API', errors); if (!cancelled) setOffers(toOffers(data)); } catch (error) { // Without api_access the error lands here and only shows up in the console console.error(error); if (!cancelled) setOffers([]); } finally { if (!cancelled) setLoading(false); } }
sortKey: BEST_SELLING brings the best-selling items of the collection to the top. You can change this sort key if the collection is set to "manually sorted" in the Shopify admin.
Settings configuration is defined as follows in shopify.extension.toml:
[extensions.settings]
  [[extensions.settings.fields]]
  key = "collection_handle"
  type = "single_line_text_field"
  name = "Collection handle"
  description = "Handle of the collection the recommended products come from"

  [[extensions.settings.fields]]
  key = "max_products"
  type = "number_integer"
  name = "Maximum products"
  description = "Number of products shown in the strip (1-12, defaults to 4)"

    [[extensions.settings.fields.validations]]
    name = "min"
    value = "1"

    [[extensions.settings.fields.validations]]
    name = "max"
    value = "12"
The merchant updates these settings from the Shopify checkout editor, without changing any code.
Full Extension Code
The Checkout.jsx below is the complete solution to all six pitfalls mentioned above:
import '@shopify/ui-extensions/preact'; import {render} from 'preact'; import {useEffect, useMemo, useRef, useState} from 'preact/hooks';
// Visible strings; in a multilingual store use locales/*.json + shopify.i18n.translate const TEXT = { heading: 'You may also like', add: 'Add', addLabel: 'add to cart', decrease: 'Decrease quantity', increase: 'Increase quantity', updating: 'Updating cart', };
export default function extension() { render(, document.body); }
function Extension() { // The merchant sets these in the checkout editor; fall back to defaults when empty const settings = shopify.settings.value; const collectionHandle = String(settings.collection_handle ?? '').trim(); const maxProducts = clamp( Number(settings.max_products) || DEFAULT_MAX_PRODUCTS, 1, MAX_PRODUCTS_LIMIT, ); // Prices come back in the currency of the buyer's country const country = shopify.localization.country.value?.isoCode ?? null;
// lines is a signal: the component re-renders when the cart changes const cartLines = shopify.lines?.value ?? []; const lineInstructions = shopify.instructions.value.lines;
const [offers, setOffers] = useState([]); const [loading, setLoading] = useState(true); // One lock for every row in the strip: the variantId being processed, or null const [busyId, setBusyId] = useState(null); // A second click in the same frame hits the ref before the state updates const busyRef = useRef(null);
async function loadOffers() { setLoading(true); try { const {data, errors} = await shopify.query(COLLECTION_QUERY, { variables: {handle: collectionHandle, first: maxProducts, country}, }); if (errors?.length) console.warn('Storefront API', errors); if (!cancelled) setOffers(toOffers(data)); } catch (error) { // Without api_access the error lands here and only shows up in the console console.error(error); if (!cancelled) setOffers([]); } finally { if (!cancelled) setLoading(false); } }
function changeQuantity(offer, nextQuantity) { // Line IDs aren't stable; read them from the current lines right before the mutation const line = shopify.lines.value.find( (item) => item.merchandise.id === offer.variantId, ); if (!line) return undefined;
// Settings are empty in the editor until the merchant fills them in: render nothing if (!collectionHandle) return null; if (loading) return ; if (offers.length === 0) return null;
function StepButton({icon, label, disabled, onClick}) { return ( onClick={onClick} disabled={disabled} accessibilityLabel={label} // border="base base": width + color. "base" alone draws an invisible border border="base base" borderRadius="base" paddingBlock="small-200" paddingInline="small-100" >
); }
function toOffers(data) { const products = data?.collection?.products?.nodes ?? []; return products .map((product) => { // Offer the first variant that's available for sale; skip out-of-stock products const variant = product.variants.nodes[0]; if (!variant?.availableForSale) return null; return { variantId: variant.id, title: product.title, price: variant.price, image: variant.image ?? product.featuredImage, }; }) .filter(Boolean); }
function clamp(value, min, max) { return Math.min(Math.max(value, min), max); }
Deployment and Merchant Setup
To deploy the extension
# Preview on a development store (for testing in the checkout editor)
shopify app dev

# Creates and releases a new app version
shopify app deploy
After deployment is complete, the merchant follows these steps:
Shopify admin → Settings → Checkout → Customize (opens the checkout and accounts editor)
Select the checkout page
In the "App blocks" section on the left panel, find "Checkout Upsell"
Drag it to the "Order summary" section, place it below the "Cost summary"
In the "Collection handle" field, enter the handle of the upsell collection
Save
The collection handle is read from the last part of the URL in Shopify admin → Products → Collections → [Collection].
Frequently Asked Questions
Does Checkout UI Extension work without Shopify Plus? Not on the checkout steps. Adding extensions to the information, shipping and payment steps is only possible on Shopify Plus and Shopify Partner development stores. Thank you and Order status page extensions, however, work on every plan except Starter. On standard plans, the code of the checkout steps can't be modified; this is a deliberate security restriction by Shopify.
Can I display products from multiple collections? Yes. You can add a second collection_handle field to settings.fields, make two separate queries, and combine the results. However, since you are making two separate API calls, you will need to adjust the useEffect dependency array and loading state accordingly.
Are Storefront API calls charged? The Storefront API is included in Shopify Plus pricing. There are no additional API costs per checkout extension. However, excessively high rate limit violations (thousands of requests per minute) can trigger throttling. Keeping the maxProducts value below 12 is sufficient.
Why isn't the extension showing up in Analytics? For checkout extensions to use the purchase.checkout.block.render target, the merchant must have activated the App block in the editor. Simply deploying it is not enough; without being placed in the editor, the extension will not render and will not appear in Analytics.
Why isn't onClick working on s-button? On the checkout surface, the s-button's onClick prop is written directly as a prop, not within buttonProps. Additionally, onClick is not triggered on buttons where disabled={true}, which is expected behavior. Check the disabledOthers state.
The upsell product was added to the cart, so why doesn't it show up right away? lines?.value depends on Shopify's cart state reactivity. When the cartLines value in the useMemo dependency array is updated, the lineByVariant map is recalculated. If there's a delay, it originates from Shopify checkout's own cart state update cycle; there's nothing to be done on the extension side.
How should I handle Turkish price formatting? You can use i18n.formatCurrency(amount, { currency: "TRY" }). However, the currency comes from the store settings; changing the price.currencyCode value to a fixed "TRY" will cause issues in multi-currency stores. It is safer to use the price.currencyCode value.
Checklist: Pre-Deployment
Checking these seven points before every new checkout extension deployment is a shortcut to writing code that works on the first deploy:
Is api_access = true present in shopify.extension.toml?
Was purchase.checkout.block.render used as the target?
Are all multi-word JSX props camelCase?
Is the icon prop omitted where s-button is used?
Is a custom stepper used instead of s-number-field in compact row layouts?
Do all cart mutations go through a single busyId?
Do border values contain color (e.g., "base base")?
This list distills what Nodus Works learned over 18 deploys while building checkout extensions for Shopify Plus stores. Each item on it cost us at least one wasted deploy.
If you'd like to talk to the Nodus Works technical team while planning your Shopify Plus checkout customization project, you can explore our Shopify Plus solutions page.